 1) Cut a piece of True Black cardstock from Papertrey Ink to 6" x 7". 6" will be how tall the card ends up being, so turn it so the 7" side is facing you and score it at 3.25" and 6.5". Fold at the scores, the 1/2" tab will adhere the two sides together. This will create the outer sleeve for the card. (Don't close the card just yet with adhesive, there is more work to do to make the pop-up work.
2) To make the insert, cut a piece of Pure Poppy from PTI to 3.25"x 5.75". Then a piece of Shimmer White cardstock to 3" by 5.25". Adhere the two together, centering the white over the red.
3) Stamp your image, centering it on the white cardstock. Decorate accordingly, for mine I used Tombow markers and Ruby Slippers Stickles.
4) Using a Making Memories Ribbon Slot Punch Tool, with the 5/8" attachment punch both at the top and the bottom both centered to make slots for the ribbon to run through.
5) On the sleeve, pick a side to be the front. Either of the 3.25" x 6" will work. Using your 3/4" circle punch take a notch out of the top of your card.
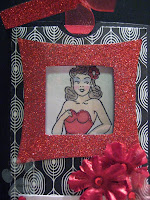
6) Cut a window, square, circle, any shape you'd want onto the front of the card that will reveal only part of your image. I chose to reveal her face, but you could reveal any part of her. I just used my craft knife to cut the window.

7) Cut the decorative paper for the front to 3" x 5.75". And using the window on your black sleeve, center the patterned paper on the card, and then trace your window from the black sleeve to your decorative paper. Don't adhere the decorative paper just yet.
8) Cut a piece of ribbon to approximately 12". I used 5/8" ribbon for my project, but I think any ribbon will work. Using some Terrifically Tacky Tape place one end of the ribbon to the front of your card at the bottom of the window you just created and adhere in place.
9) Run the ribbon then through the bottom slot on your insert so that the ribbon will run along the back side of the red paper. Then run the ribbon back through the top slot to the front of the insert where your image is. Allow the ribbon to slide freely through the slots.
10) With the image completely in the sleeve and the ribbon pulled taught, add adhesive to the 1/2" strip of black and close up the sleeve by adhering the 1/2" strip to the inside of the 3 1/4" x 6" so that it completely hides the 1/2" strip.
 11) If it has been assembled right, a pull on the ribbon at the top of your insert should pop the insert out of the sleeve. You can add something to the top of the ribbon, and cut to a desired length. Here I used a simple chipboard tab from Basic Grey that I covered with fine red glitter.
12) Once it works as you'd like, cover the front including where the ribbon was adhered with your decorative paper. Here I used a piece of Black and White Basics from Papertrey Ink. Then finish decorating as you'd like. The flowers that I used are Prima, the red sparkly square was actually a piece of adhesive chipboard from Basic Grey that I covered the adhesive with fine red glitter.
The sentiment is from Verve Stamps from a set called Birthday Suprise and is embossed in red.
Hope that all made sense!! Have a lovely week and thanks for visiting!

No comments:
Post a Comment